Introduction
In this article, we are going to discuss how BridalLive exports information to QuickBooks Online. In our experience, this topic can be difficult to understand for those who aren't accountants. We will do our best to explain it in a way that everyone can understand, but since we aren't accountants either, please seek professional assistance with your QuickBooks Online Export. We've partnered with a financial consultant to help you with all your accounting questions.
Please note that this feature requires QuickBooks Online Plus.
Receiving Vouchers
A Receiving Voucher is created in BridalLive when you receive merchandise from a vendor. Typically, when the box shows up, you’ll unpack the box, locate the invoice and create the receiving voucher using the details on the invoice. Doing this will increase the QOH for the items that you are receiving and as a result increase the value of your inventory.
On the Receiving Voucher, you are able to specify any additional fees or freight charges from the Vendor, as well as any discounts. You also have fields to enter the Invoice Date, the Invoice Number and the Check number used to pay the invoice. These fields remain editable even after completing the voucher so you can always come in and make changes. When a Receiving Voucher has been exported to QuickBooks, you'll see a QB Icon on the Receiving Voucher (see below). Clicking this icon allows you to jump directly into QuickBooks to view the bill.

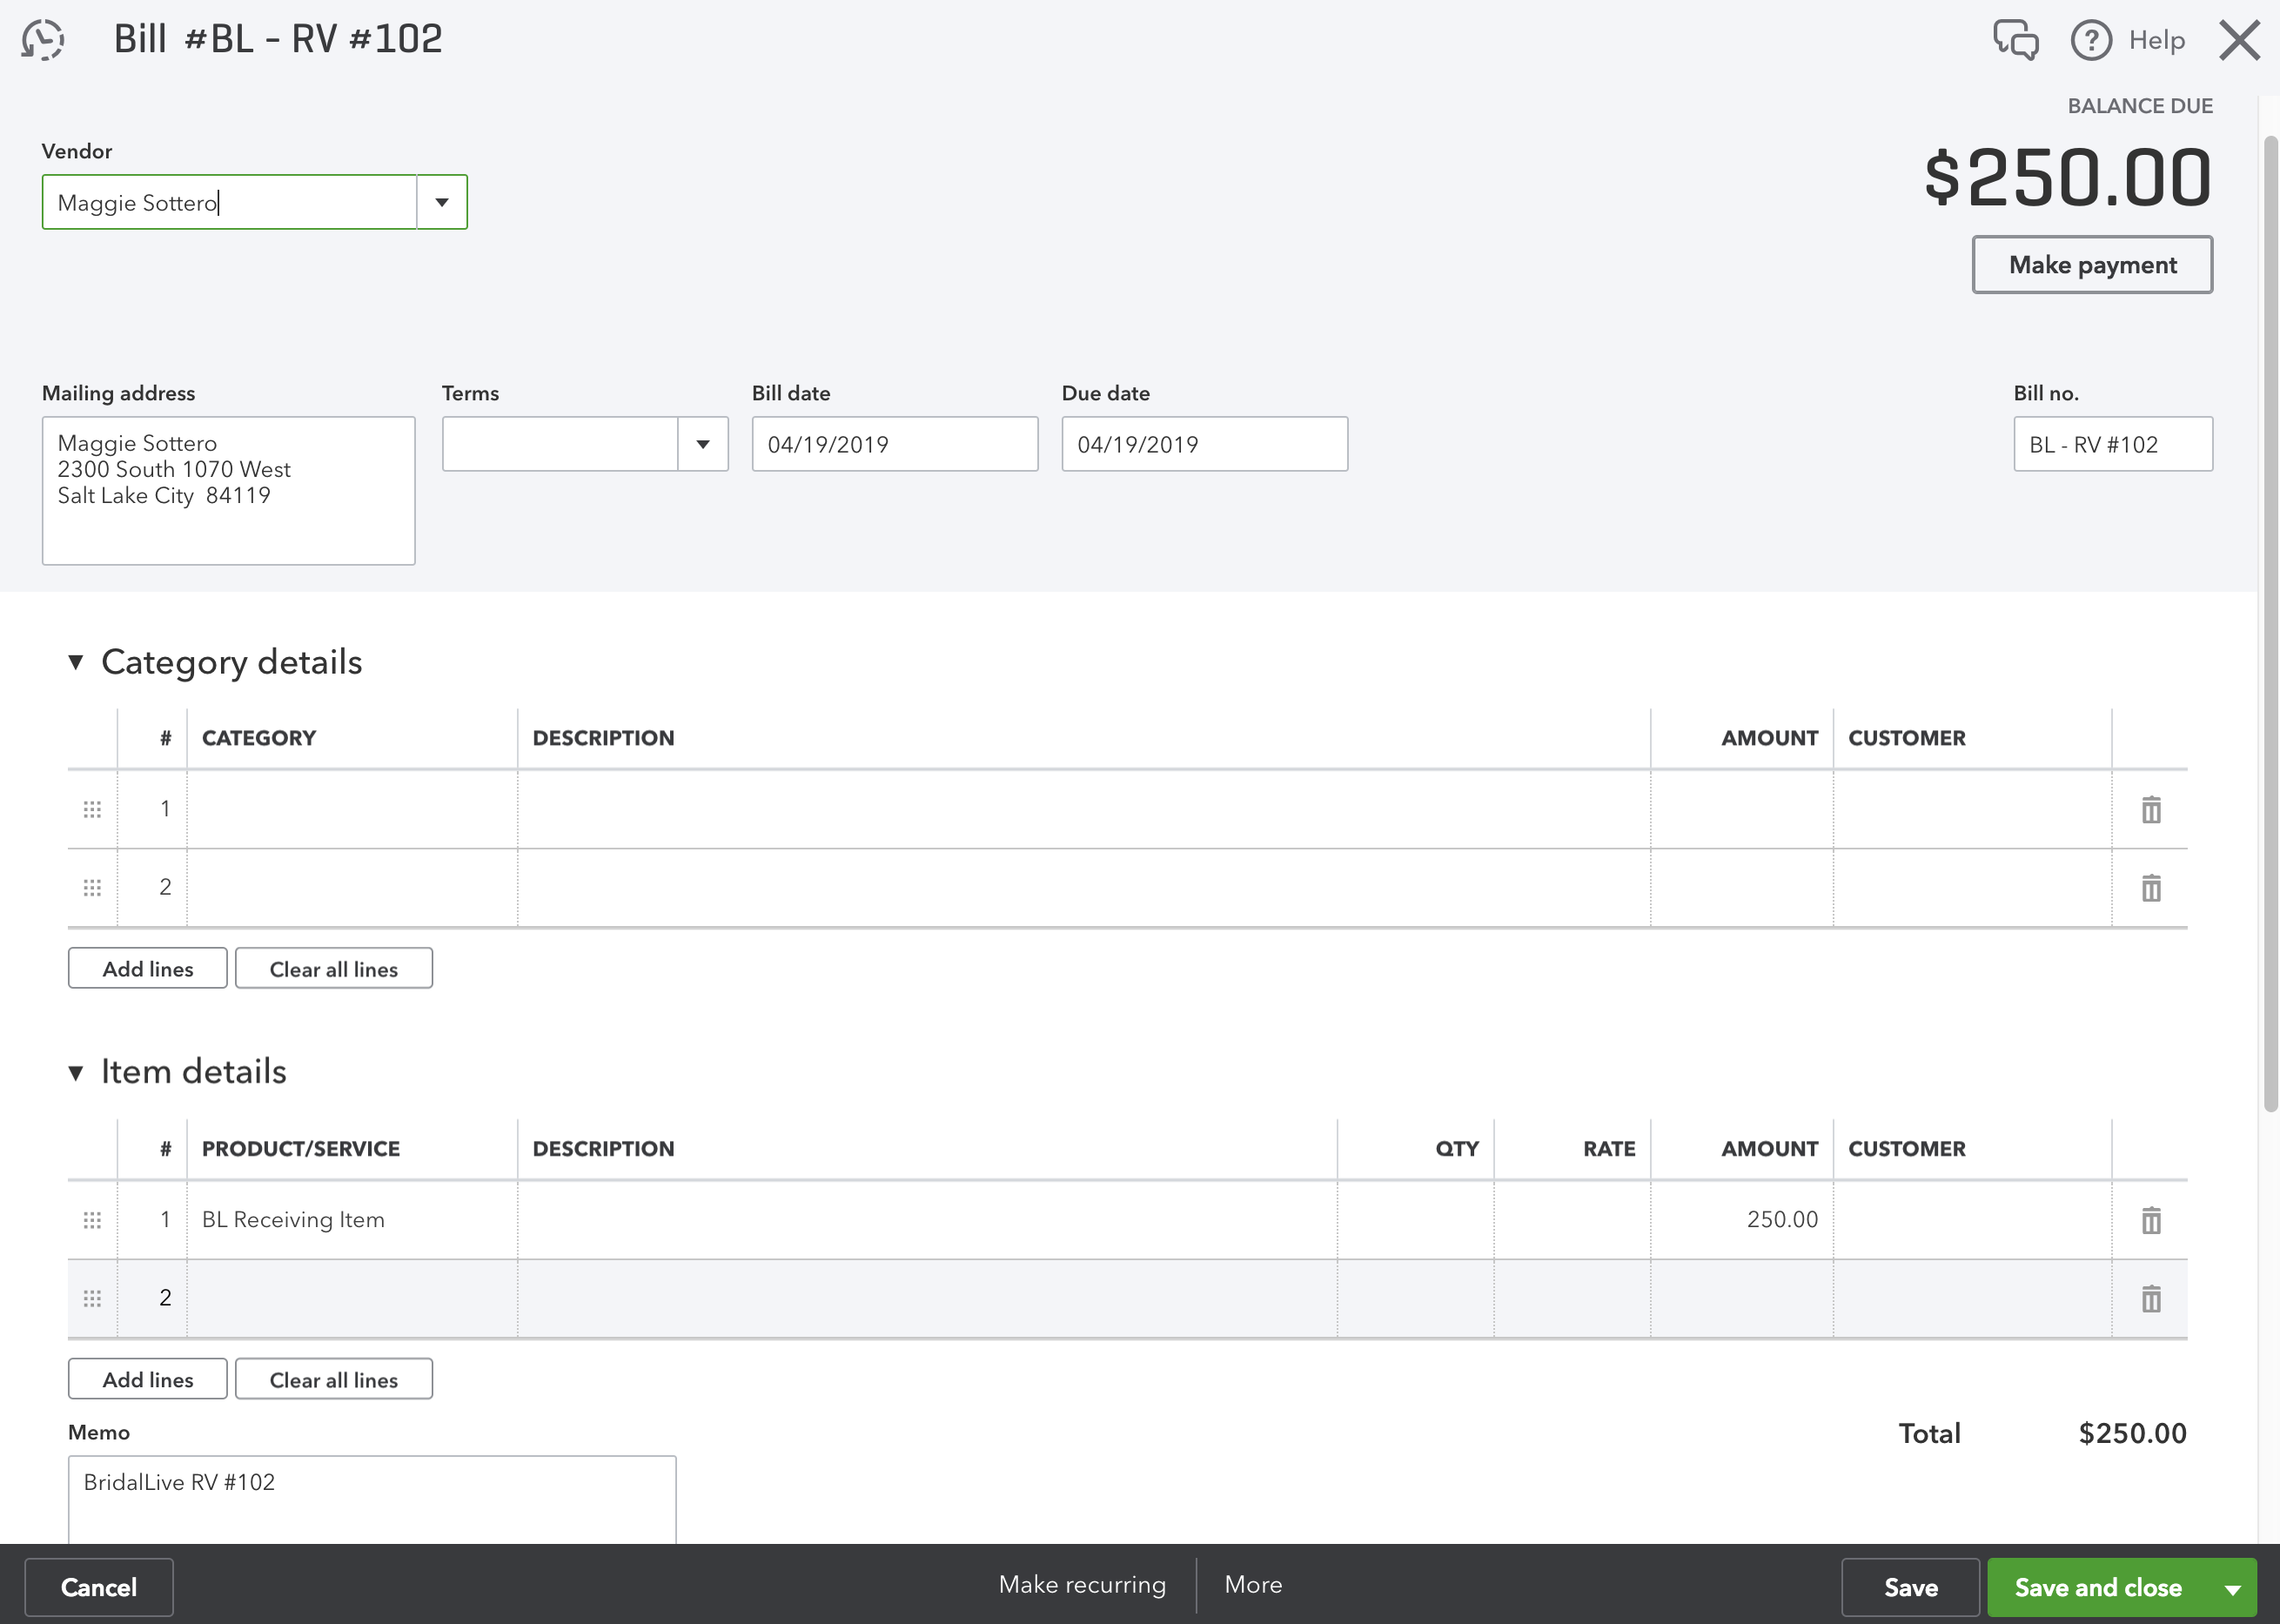
Once you’ve exported a Receiving Voucher as a Bill to QuickBooks, you’ll see the information from the Voucher in BridalLive on the Bill in QuickBooks.

You can see in the screenshot above that the Bill is linked to the QuickBooks vendor and the Vendor’s address details are populated. If you have payment terms with the vendor, those will be displayed. The Bill Date is the Invoice Date you entered into BridalLive. The Due Date is calculated by QuickBooks based on your terms and the Bill Date.
Next, you’ll see the Category Details. This is where the Discount, Freight and Fee amounts will be added. The accounts used here are the ones you specified when setting up the QuickBooks Export.
Below the Category Details is a section called Item Details. BridalLive does not sync your inventory to QuickBooks. There are just too many quirky issues that can happen with that and this feature is supposed to save you time, not introduce new headaches into your life. To simplify things, BridalLive creates an item called BL Receiving Item in QuickBooks and uses that item to increase your Inventory account’s balance when bills are created. The amount shown here will be the Subtotal on the Receiving Voucher.
Lastly, you’ll see that BridalLive puts the Receiving Voucher number in the memo field. We do this to help you locate the associated BridalLive Voucher should you ever have to.
Sales and Sales Tax
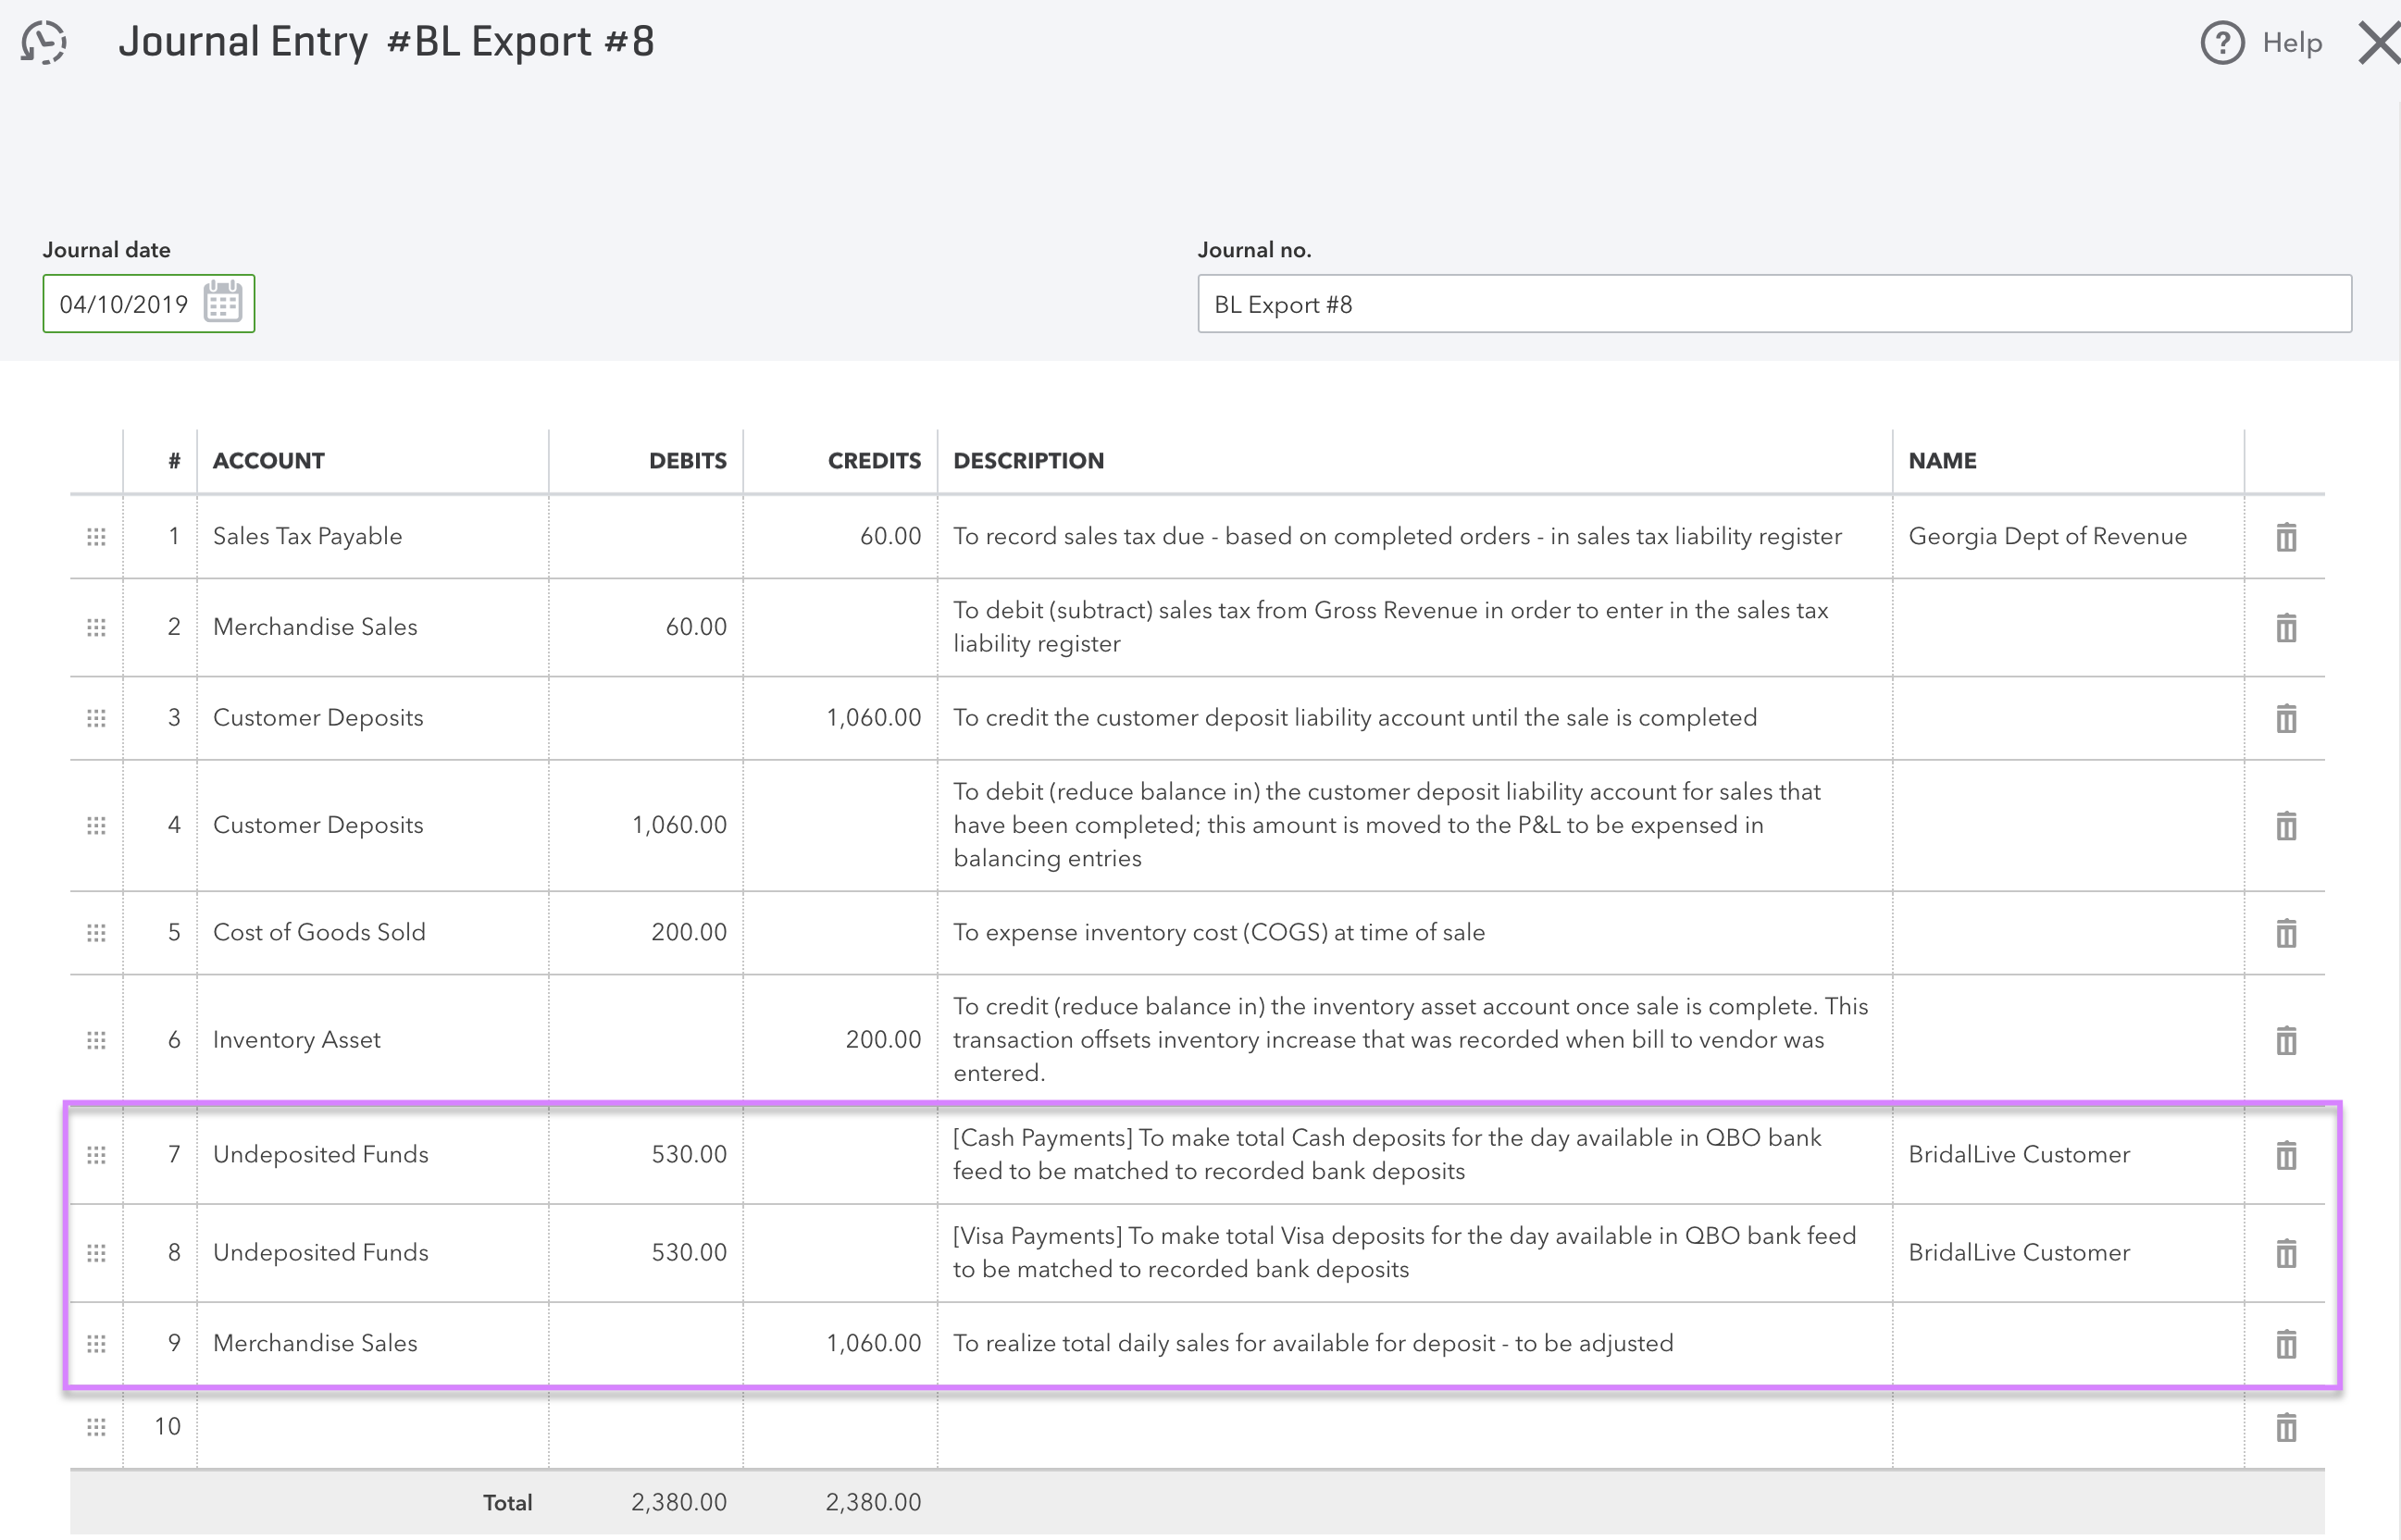
This is by far the most complex piece of the export. We’re going to try our best to explain this in a way that every business owner can understand. Since we aren’t accountants, we aren’t qualified to give accounting advice, so it is best to speak with your Accountant or Bookkeeper if you have any confusion. Please watch the video above for details on the Journal Entries that are made.
There are 2 components of this export option: Sales and Sales Tax. As you know, BridalLive recognizes Sales Tax when a Transaction is completed. Completing a transaction indicates that the customer has taken ownership of the merchandise.
What’s important to understand here is that QuickBooks doesn’t know what’s going on in BridalLive. It doesn’t know whether a deposit to your bank account was a full payment for a Sale, a deposit placed on a special order, or a final payment used to complete a special order. As a result, the BridalLive Export works under the assumption that you are booking all deposits to your Merchandise Sales Account. Then, the export will make journal entries to move funds from/to this account when payments are made and orders are completed.
This is absolutely critical: You must book bank deposits to Merchandise Sales or your sales figures will be wrong. This can be done in one of two ways:
- Downloading your banking transactions into Quickbooks and categorizing the deposits as Merchandise Sales. Talk with your accountant if you don’t know how to do this
- Using the Undeposited Funds export feature and "Making a Deposit" manually in QuickBooks
The easiest thing to do is to link your bank account in QuickBooks and download the transactions. QuickBooks will allow you to select an account for the deposit and you’ll select Merchandise Sales. QuickBooks Online is smart and will learn to automatically categorize your deposits after it’s seen you do it a few times. It’s important to note that while this is the fastest and easiest option, if you are a stickler for reconciliation, then you’ll need to use the Undeposited Funds feature.
Please watch the video above for details on the Journal Entries that are made.
Cost of Goods Sold
BridalLive has the option to specify both an Inventory Cost and an Order Cost. The Inventory Cost is the amount you paid for this specific item. If it’s a bridal gown, this is the cost of the sample. The Order Cost is how much it costs to re-order this product with the vendor.
If an Item is sold from Stock, BridalLive will use the Inventory Cost of the Item. If the Item has been Special Ordered, BridalLive will use the Cost from the Receiving Voucher, which is the actual cost of the reordered Item. When an Item is Sold, BridalLive will debit the Cost of Goods Sold account by the Cost of the Item. The entry is balanced by a Credit to your Inventory account in QuickBooks.

Undeposited Funds
When payments are received, they will come into QuickBooks on Journal entries broken down by payment method. These entries Debit Undeposited Funds and Credit to Merchandise Sales.

The Journal Entries are created in a way that makes it easy for you to use the "Make a Deposit" feature in QuickBooks. To make a deposit, click the + icon at the top of QuickBooks online and choose Bank Deposit. Please Review the video above for details on how this is done.
You’ll see all of the Undeposited Funds Entries from earlier. You can select the Payment Method if you’d like. Once you’ve done that, just click "Save and Close" and the deposit will be recorded.