Now that you have your Payment Plan settings right and all your setup done, you're ready to begin taking payments with your automatic Payment Plan! Please note that in the below, examples are set with our example permissions, and exactly what you or your employees see may be different based on the permissions given to them. Payment Plans can be created from many different areas of BridalLive, but this article will focus on creating the Payment Plan from the transaction.
It is very important when using Payment Plans that you do not add or edit any Payment Plans when you are traveling to a different Time Zone outside of your store's Company Profile Time Zone. If you are in a different Time Zone than your Company Profile, you may see the dates as different dates, but the plan will send according to the Time Zone of the Company Profile.
1. Add Payment Plan
Payment Plans will be added to a transaction. To add a Payment Plan, navigate to a Special Order or a Layaway transaction type, go to More Actions, and select Add Payment Plan.
*If you do not see Add Payment Plan under More Actions, please review the Payment Plan Settings article.
2. Create Payment Plan
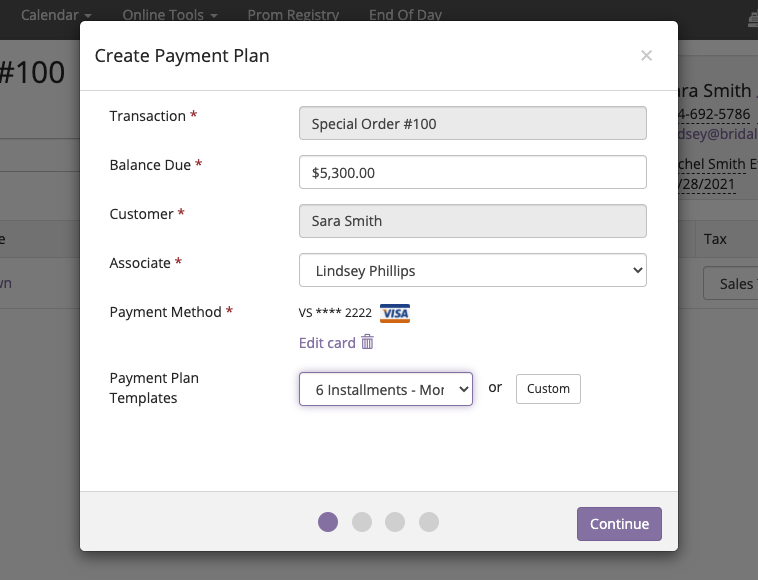
From the Create Payment Plan screen, you will be able to add all the necessary information to begin creating your payment plan for the transaction.
- Transaction - When creating the Payment Plan from the transaction, the transaction number will be pre-filled for you and unable to be edited.
- Balance Due - The Balance Due on the Payment Plan will equal the Amount Due on the transaction.
- Customer - When creating the Payment Plan from the transaction, the Customer will be pre-filled for you with the Contact information on the transaction. This information will not be able to be edited.
- Associate - The Associate will be pre-filled based on your Point of Sale Preferences with your settings for Default associate for new payments.
- Payment Method - This will default to the card on file for the Contact. If there is no card on file, you will be prompted to add a card on file prior to being able to move forward with creating the Payment Plan.
- Payment Plan Templates - You will see your Payment Plan Templates in alphanumeric order, or you can create a Custom template directly from this screen.
Once you have all of the information added click Continue.
3. Review Payment Plan
BridalLive will show you the settings you selected based on your already created Payment Plan Template or your settings based on creating a custom template. You will see a new option under Frequency called First Installment Date. This will be the date set for the first charge. If the date is set to the current date for First Installment Date, you will be prompted at the end of adding your Payment Plan to Charge Plan.
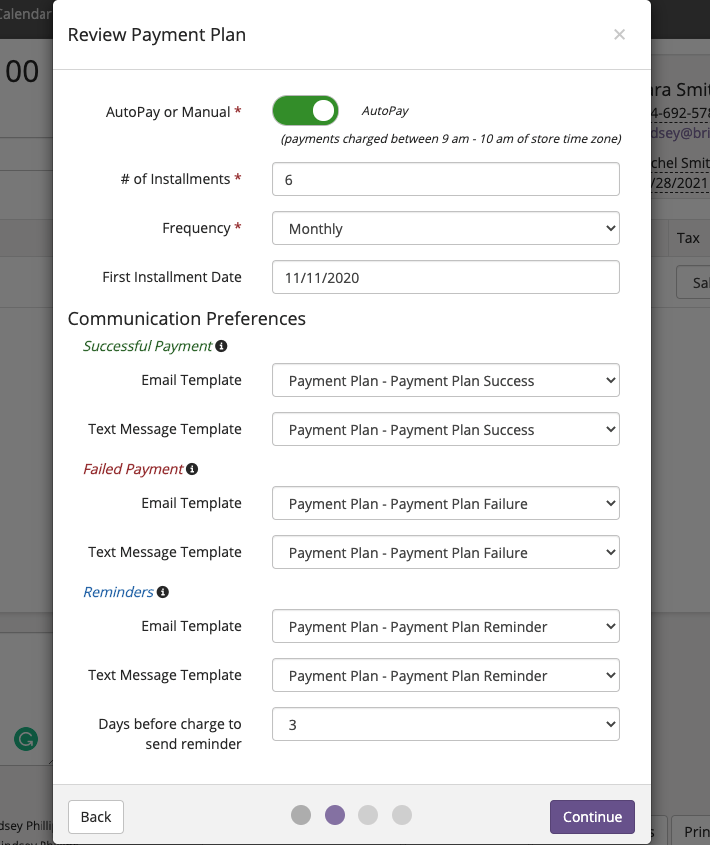
Once you've reviewed your Payment Plan and everything looks how you want it, click Continue.
4. Payment Plan Details & Schedule
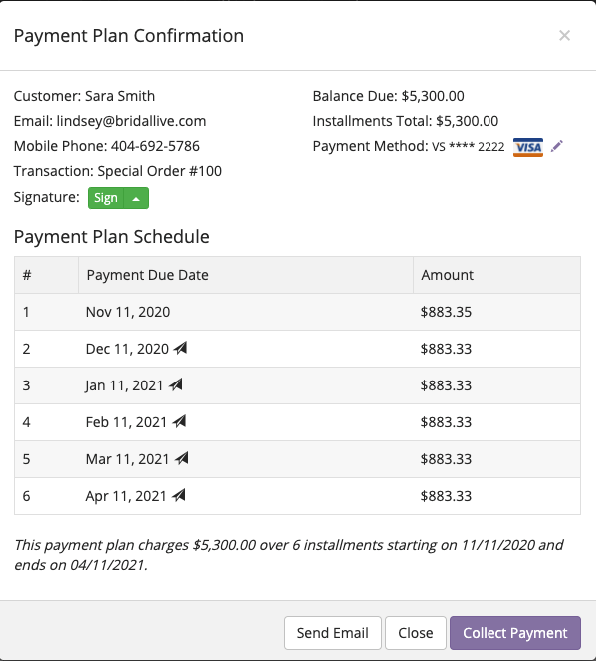
BridalLive will generate the Payment Plan based on your settings. Please review Contact information, Transaction information, and the Installment information.
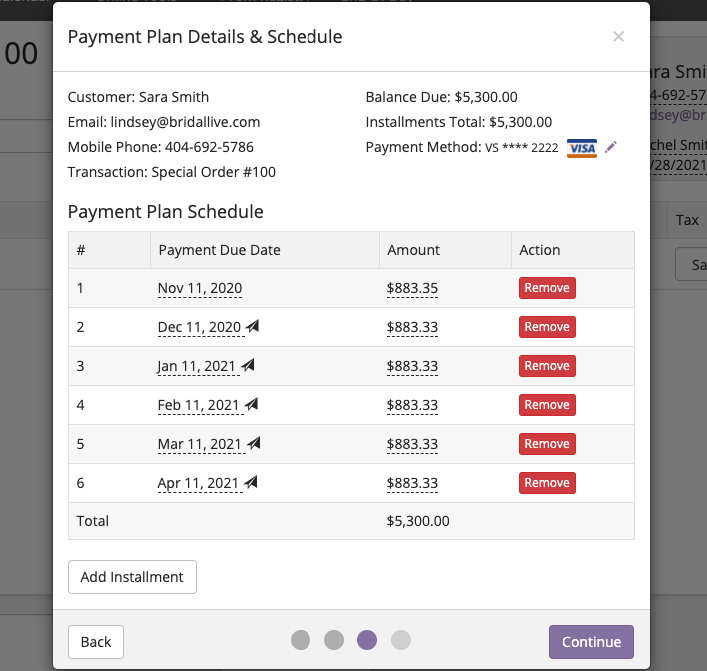
Based on the user permissions, if you need to update the installment date, you can do so by clicking on the date with the dotted underline. You can remove any unwanted installments or Add Installment if necessary. If you add or remove an installment, and your Amounts do not add up to the Balance Due, you will see a warning.

You will also notice that any change from the installment that could not be evenly applied will be applied to the first installment.
Once you have reviewed the Payment Plan Details and Schedule, click Continue.
5. Payment Plan Confirmation
Confirm and Save the Payment Plan
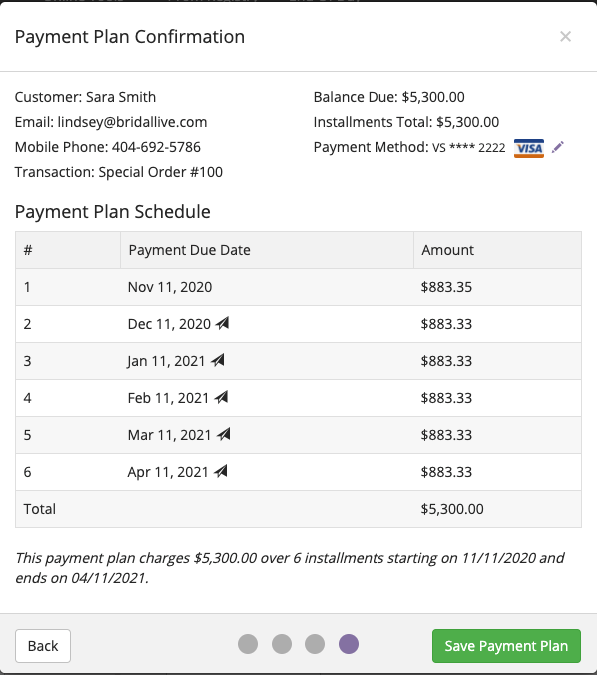
6. Send Email and Collect Payment
Once you've saved the payment plan, you will be given the options to have the customer sign the Payment Plan Agreement, Send Email (this is a good time to send the Overview email), and also Collect Payment if today is the first installment date.
Collect Payment Options
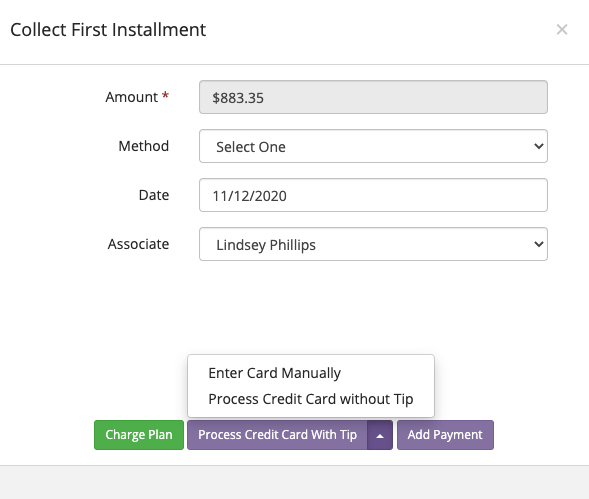
Depending on your integrated credit card processor, your Collect Payment options may be different.
Charge Plan - This will charge the payment with the card on file for the Payment Plan
Enter Card Manually - This option will allow you to manually enter card details. You could use this option if someone else wanted to pay for this first payment installment.
Process Credit Card - When you choose to Process Credit Card, this option will light up your associated terminal. If you have tips enabled on your account with BridalLive Pay, you will see the options to process with or without tip.
Add Payment - The Add Payment option is used for payments that are taken OUTSIDE of BridalLive with an external payment method. You will need to select the Method in the fields above before using this option.