The Advanced Settings tab allows you to further configure the functions available within your shop's Client Portal. In this article, we'll walk through each setting and describe how it affects the usability of the Client Portal.
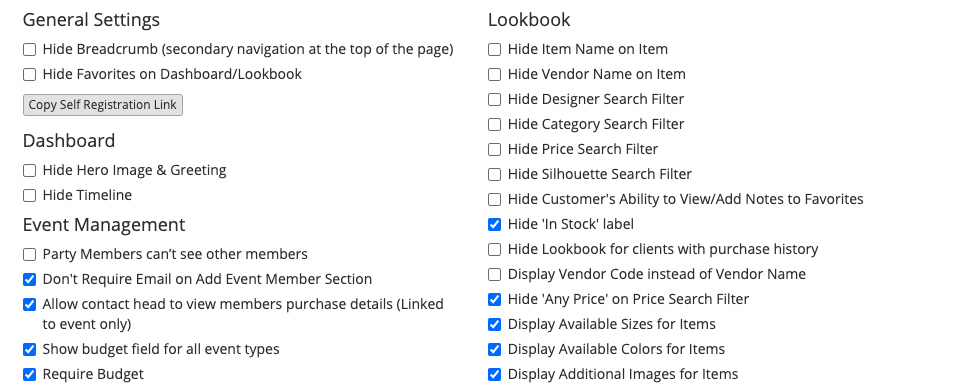
To access the Advanced Settings section of the Client Portal, navigate to Settings Company Client Portal Advanced Settings Tab. You will be presented with a screen that looks like this:


General Settings
- Hide Breadcrumb - "Breadcrumb" is a term used for the secondary navigation on a web page that allows the user to easily navigate to a page higher up in the hierarchy. You would only want to hide breadcrumb navigation if you don't want your users to access the Dashboard from the Payment, Measurement, Event, or Lookbook pages. This feature essentially allows you to have a standalone Payment and/or Measurements page without giving your clients access to the rest of the Portal.
- Hide Favorites on Dashboard/Lookbook - This setting will hide the customers' favorites from the Dashboard and the Lookbook areas
- Copy Self Registration Link - This link will allow the customer to register themselves in BridalLive and in the Client Portal prior to being a Contact in BridalLive.
Dashboard
- Hide Hero Image & Greeting - You have the option of completely hiding the greeting and hero image on the dashboard.
- Hide Timeline - Some business owners may not want their contacts to see everything that is displayed on the Timeline. If you fall into this group of people, feel free to check this box.
Event Management
- Party Members can't see other members - This setting will control if you allow party members to see what other members are in the party and the completed steps
- Don't Require Email on Add Event Member Section - Your customer will not be required to enter an email address to add a party member
- Allow contact head to view members purchase details (Linked to event only) - This will show the event contact what items the party members are purchasing.
- Show budget field for all event types - You can require all customers to enter a budget for all event types or only bridal
- Require Budget - Budget is required before moving on
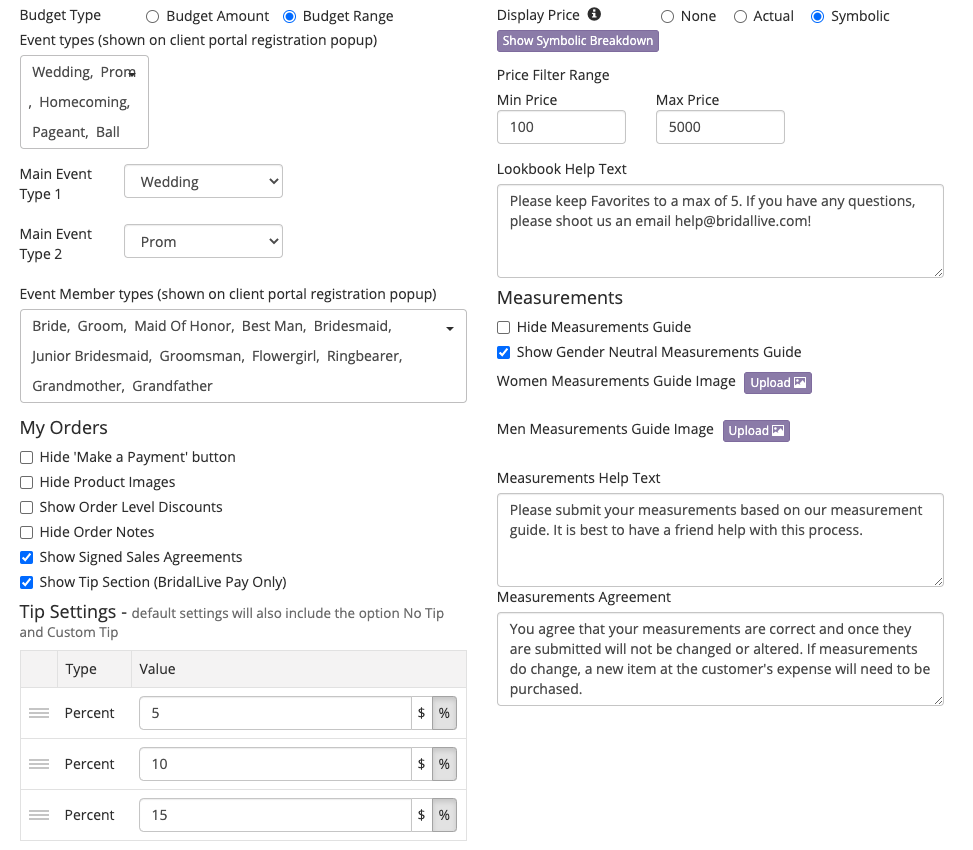
- Budget Type: Budget Amount or Budget Range - You can decide to allow your customers to input a number for their budget or require them to select from your pre-setup budget ranges
- Event types (shown on client portal registration popup) - You can select which Event Types you would like to allow people to register for when they are on the Client Portal
- Main Event Type 1 - Default event type #1 on the left
- Main Event Type 2 - Default event type #2 on the right
- Event Member types (shown on client portal registration popup) - Only these event member types will be shown to the customer for party members
My Orders
- Hide "Make a Payment" button - By default, the My Orders page has a "Make a Payment" button for each order that has a balance due. When this button is clicked, the payment amount has defaulted to the Balance Due. If you don't want your users to make payments by clicking this button, you have the option to hide it.
- Hide Product Images - Each item on the My Orders page shows it's Cover Photo. If you'd like to hide this photo, select this option.
- Show Order Level Discount - This will show the transaction level discount if it is enabled and added
- Hide Order Notes - This can hide any order-level notes that are added to the transaction
- Show Signed Sales Agreements - All signed sales agreements will be viewable
- Show Tip Section (BridalLive Pay Only) - When the customer clicks the received Request Payment link or goes to the My Orders in the Client Portal with BridalLive Pay, the Client Portal can show three tip options based on $ or % using your settings provided. As well as the three provided tip options, BridalLive will show a No Tip option and a Custom Tip option.
Lookbook
- Hide Item Name on Item - Select this option to hide the name of the item on the Lookbook
- Hide Vendor Name on Item - Select this option to hide the item's Vendor Name on the Lookbook
- Hide Price on Item - Select this option to hide the price of the item on the Lookbook
- Hide Designer Search Filter - Select this option to hide the ability to search by Vendor (i.e Designer) on the Lookbook.
- Hide Category Search Filter - Select this option to hide the ability to search by Category (i.e Department) on the Lookbook
- Hide Price Search Filter - Select this option to hide the ability to search by Price on the Lookbook
- Hide Silhouette Search Filter - Select this option to hide the ability to search by Silhouette on the Lookbook
- Hide Customer's Ability to View/Add Notes to Favorites - Select this option to hide the ability for your clients to leave comments on products that they "Favorite" on the Lookbook.
- Show 'In Stock' label- Select this option to show an In Stock label for all items that are "In Stock" at your shop. In order for the label to be displayed, the Item's In Stock Qty must be greater than 0.
- Hide Lookbook for clients with purchase history - Once your customer has any purchase history, you can use this setting to hide the Lookbook if you no longer want them reviewing your inventory
- Display Vendor Code instead of Vendor Name - This will display the code set for the vendor instead of the actual name.
- Hide 'Any Price' on Price Search Filter - Price filter will use a min and max number instead of using any price
- Display Available Sizes for Items - Once an item is selected, all available sizes for the item will be displayed.
- Display Available Colors for Items - Once an item is selected, all available colors for the item will be displayed.
- Display Additional Images for Items - If you have multiple images for an item, you can select to display all of them
- Display Price - None, Actual, Symbolic
- None - No price will be shown on the item in the Lookbook
- Actual - The actual price will be shown on the item in the Lookbook
- Symbolic - A symbolic breakdown of your lowest to your highest price Lookbook items will be shown
- Price Filter Range - You can set the Min Price displayed and the Max Price displayed
- Lookbook Help Text - If you would like to display information to your customers about using the Lookbook, you can do that here.
Measurements
- Hide Measurements Guide - Select this option if you would like to hide the Measurements guide that comes along with the Client Portal.
- Show Gender Neutral Measurements Guide - Select this option if you would like to use a "Gender Neutral" version of the Measurements Guide.
- Women Measurements Guide Image - You can upload your own measurement guide. Please limit the image to 500K. Some larger images may fail to upload.
- Men Measurements Guide Image - You can upload your own measurement guide. Please limit the image to 500K. Some larger images may fail to upload.
- Measurements Help Text - You can optionally include an HTML capable blurb of text that instructs your clients on how to measure themselves or how to select a size based on a size chart. This field can contain HTML and links to other pages on the internet.
- Measurements Agreement - You can optionally include an HTML capable measurement terms and conditions that your clients must agree to before submitting their measurements. If you enter something in this field, your clients will be required to click a checkbox before submitting their measurements.