Before using the Client Portal, you'll need to enable it for your account. This article will show you how to enable/disable the portal and discuss how billing is handled.
Client Portal Billing
The portal is a new product that works in conjunction with your BridalLive Account. As such, it is billed separately. With the Client Portal, you are only billed for the time that it is enabled for your account.
Upon enabling the portal, your account will be billed for 1 month of usage. If you decide to disable the portal midway through your billing cycle, we will apply a credit to your account for the pro-rated differnce. For instance, if you decide to disable the Client Portal midway through your billing cycle, we will apply a credit to your account for 50% of the portal's monthly cost. When your next billing occurs, the credit will be applied before we charge your card.
If you are testing out BridalLive and your account is "Trialing", you will not be billed for the portal until your first paid renewal.
Enabling Client Portal
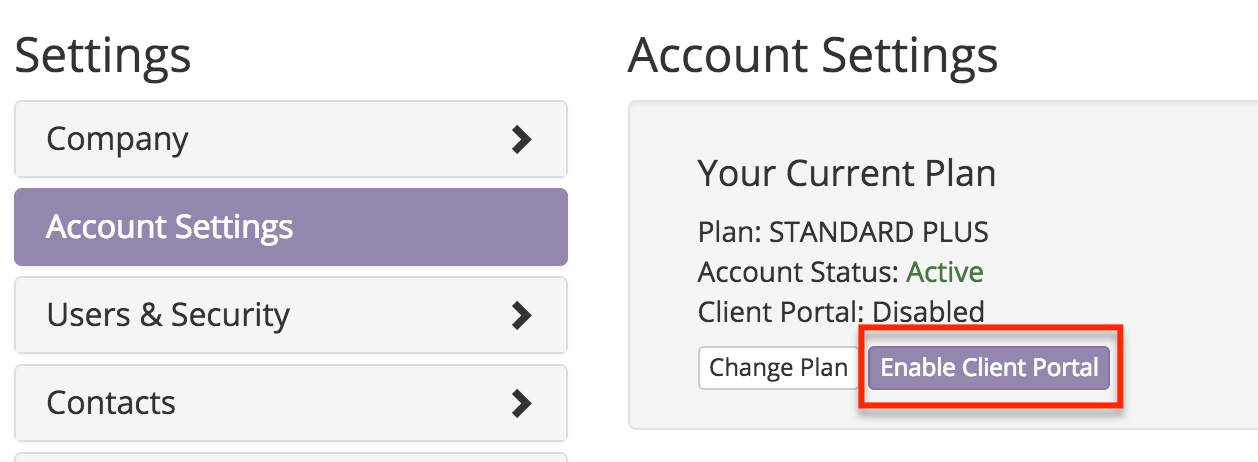
Enabling the Portal is easy. To do so, simply navigate over to Settings Account Settings and click the "Enable Portal" button shown below:

Clicking "Enable Portal" turns on the Client Portal feature
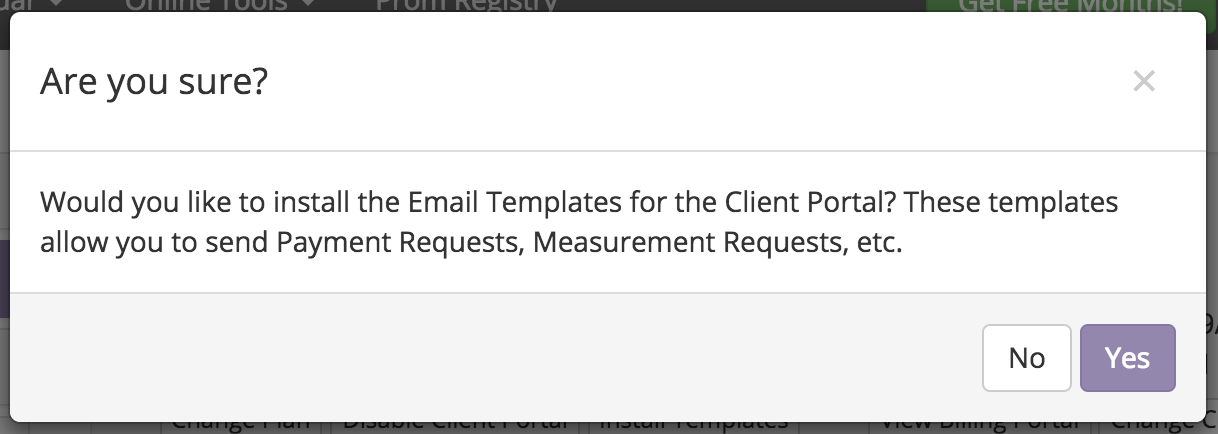
You will be asked to confirm your decision. Once you've done so, BridalLive will ask if you'd like to install the Email and SMS templates that come along with the portal. Click "Yes" to have these templates automatically installed.

Click 'Yes' to install templates
If you select "Yes" and already have the Client Portal Templates installed, BridalLive will not install them again. You will receive an error message letting you know that the templates were not installed. If you'd like to re-install the templates from scratch, you will first have to delete all templates that have a Client Portal Merge Key. Feel free to contact us if you have any trouble.
Enabling Client Portal Features for your user account
Once the Portal is enabled, you will need to grant access to the Client Portal features in BridalLive. To do so, follow these steps:
- Navigate to Settings Users & Security User Roles.
- Edit the User Role assigned to the user that you are currently logged in as.
- Place a checkbox next to all of the Client Portal related permissions. Some of the more important ones are listed below.
There are several user permissions that can be enabled/disabled to control which features of the Client Portal are visible inside of BridalLive. At the time of publishing this article, the available permissions are shown in the table below. After granting these permissions, you will need to Logout and Log back in to refresh your user account's visibility for these features.
| Permission Group | Permission Name |
|---|---|
| Settings | Client Portal Settings |
| Client Portal | Request Measurements |
| Client Portal | Request Payments |
| Client Portal | Request Signatures |
| Client Portal | Edit 'Show on Lookbook' |
| Online Tools | Event Registrations |
| Online Tools | Online Payments |
| Online Tools | Online Signatures |
| Online Tools | Online Measurements |
| Online Tools | Contact Update Requests |
Disabling the Client Portal
If you'd like to stop using the Client Portal features, you can disable it by going to Settings Account Settings and clicking "Disable Client Portal".

Turn off Client Portal by clicking "Disable Client Portal"