In this article, we will walk through the steps needed to connect the Ingenico Link 2500 to your network and then adding it as a terminal to MerchantTrack.
Boot up the Link 2500
- The terminal will boot to the TriPOS screen regardless of a wifi connection.
- If this is a first-time setup, once the terminal is connected to the wireless network this device will display an activation code.
Connect to your Wifi network
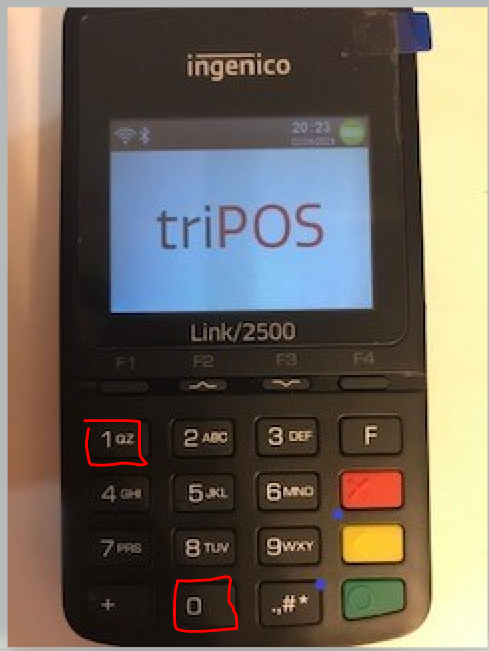
- To connect the terminal to the wifi, power the device on and allow it to boot to the TriPOS screen, once on this screen tap 0-0-0-1
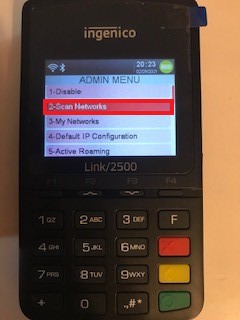
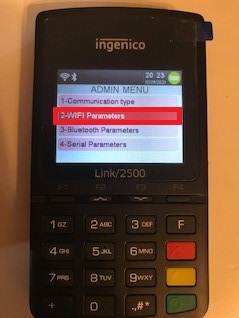
- On the next screen you will use the F2 key to scroll down to WIFI Parameters:
- On the next menu, select Scan Networks. Once the list of Networks populates use the F2 key to scroll down and highlight the network you would like to connect to, once highlighted use the green button to select that network.
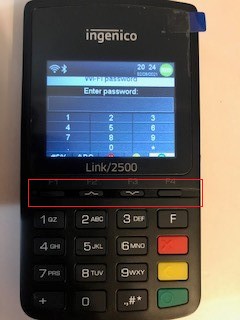
- On the next screen, you will need to enter the wifi password. You can enter the password with T9 texting style by repeatedly tapping the numbers for the appropriate letters or you can use the Function keys at the top to scroll around the On-Screen keyboard.
- Once the password is entered (Password is case sensitive) the device will show "New Profile OK" and you will enter back into the main screen and the wireless connection in the top left corner of the screen should turn green.
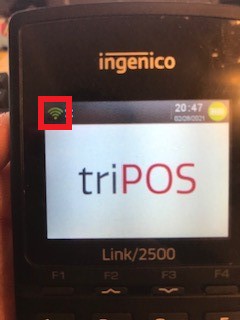
- Once green, an activation code should populate on the screen, If not Press and hold the # and Yellow keys, and the device will reboot if plugged in. (If unplugged, the device will power down, power the device back on by holding the green key.)
To remove a network connection from the terminal:
Please note, the terminal will need to be out of the range of the network to be able to access the menu for this step.
- Once the terminal is out of range of the network, access the menu using the 0-0-0-1 code and select WiFi Parameters:
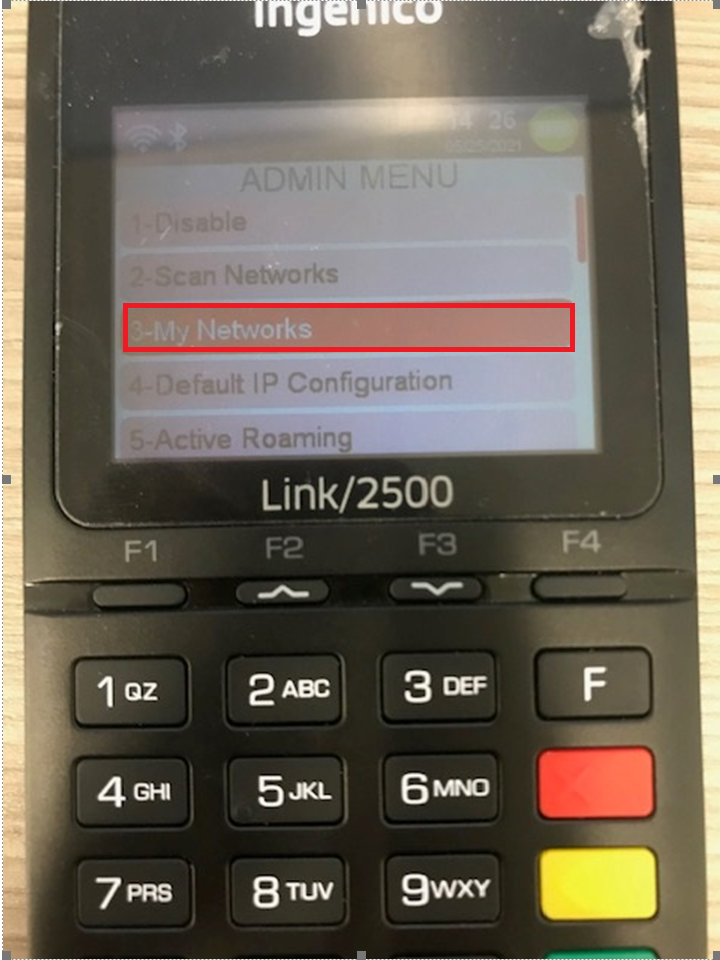
- On the next screen, highlight and select "My Networks"
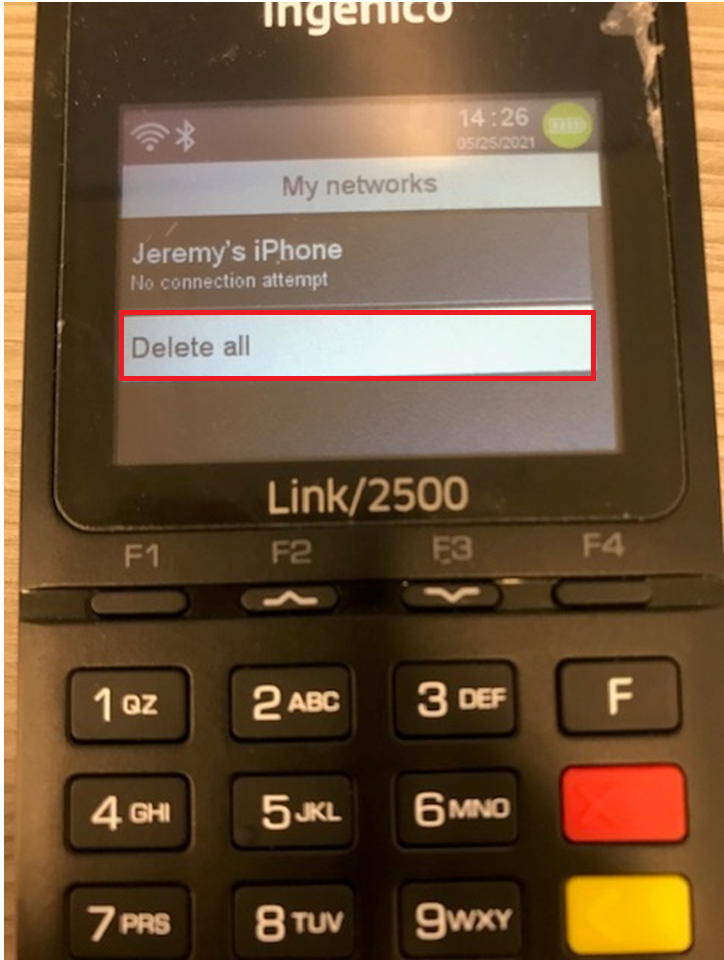
- On this last screen, select "Delete All", a prompt will appear stating "Remove Profile Ok" indicating that the networks have been removed from the terminal:
Link 2500 Key Functions
- (F1) - Scrolls the selection to the left
- (F2) - Scrolls the selection up
- (F3) - Scrolls the selection down
- (F4) scrolls the Selection to the Right
To power off Link/2500, unplug the device then press the .,#* and Yellow keypad buttons simultaneously. Pressing the .,#* and Yellow keypad buttons simultaneously without unplugging the device first will result to the device rebooting instead of powering off.
Activate device in MerchantTrack
- Navigate to MerchantTrack Single Sign On by clicking your name in the top right of BridalLive and select Open MerchantTrack
*If you do not see this button, please enable your MerchantTrack Single Sign On - Navigate to Terminals and select Activate Terminal
- Enter the Activation Code
- Give the device a description
- Select the correct Merchant if you have more than one location
- Click "Activate"
- Device will begin to activate and reboot. This process can take a moment, so please be patient.
- The device will read "TriPOS" when the activation is successful.
Having trouble activating the device? Check out our Troubleshooting article
Link BridalLive to the Device and Test a Payment
Once your device is setup within Merchant Track, it's ready to be linked to BridalLive. We have a separate tutorial for that will walk you through the process. Click here to continue.
Take Associate Tips with BridalLive Pay
Once your device is activated and setup in BridalLive, you can set your terminal up to accept tips! Review our guide here for more info.
BridalLive Pay Reporting
BridalLive Pay has many options for payment reporting. To access reports in BridalLive, navigate to Reports in the bottom left and select BridalLive Pay Reports. Please also review your End of Day processes at the top of BridalLive. This will allow you to review all payments inside BridalLive and your MerchantTrack account for payment reconciliation.
Payment Search - This report gives you a list of all BridalLive Pay payments from your MerchantTrack received during a particular time frame. Run this report at the end of every day as part of your reconciliation process.
Funding Report - This report shows you payment funding details
Tip Report - This report displays a summary of tips for associates.
Tip Item Journal - This report displays a detailed breakdown of all payments that have tips for associates.
Pre-Authorized Payments - This report displays a detailed breakdown of all payments that have tips for associates.
To locate your monthly Merchant Statement and further payment-specific reporting, please user MerchantTrack by clicking your name in the top right and selecting Open MerchantTrack. *If you do not see this button, please enable your MerchantTrack Single Sign On